ホーム » QGIS (ページ 6)
「QGIS」カテゴリーアーカイブ

QGIS(pythonでpostgresql)
以下はまんま「stackexchange」です。
忘れないようにコピー。
How to perform SQL queries and get results from QGIS python console?
8
down vote
accepted
1) With PyQt4.QtSql: Gary Sherman shows how to query a spatial table in Creating a PostgreSQL Connection From a QGIS Layer Datasource:
from PyQt4.QtSql import *
layer = iface.activeLayer()
uri = QgsDataSourceURI()
uri.setConnection(“localhost”, “5432”, “testpostgis”, “me”, “”)
uri.setDataSource(“public”, “teststrati”, “the_geom”)
# add the layer to the canvas
vlayer = QgsVectorLayer(uri.uri(), “tot”, “postgres”)
# now query the table
db = QSqlDatabase.addDatabase(“QPSQL”);
db.setDatabaseName(uri.database())
db.setPort(int(uri.port()))
db.setUserName(uri.username())
db.setPassword(uri.password())
db.open()
# query the table
query = db.exec_(“””select * from teststrati”””)
query.next()
query.value(0)
130
# etc read the documentation of QtSQL
And you can open all the other tables/views (spatial or non spatial) similarly:
db = QSqlDatabase.addDatabase(“QPSQL”)
db.setHostName(“localhost”)
db.setPort(5432)
# non spatial table or view
db.setDatabaseName(“people”)
db.setUserName(“me”)
db.setPassword(“”)
query = QSqlQuery(db)
query.exec_(“select * from people;”)
# etc.
2) Or you can use the standard Python module for PostgreSQL/PostGIS: Psycopg2:
import psycopg2
conn = psycopg2.connect(“dbname=’testpostgis’host=’localhost’ user=’me'”)
cur = conn.cursor()
sql = “””SELECT “DIP_DIR”,”DIP”, ST_AsGeoJSON(the_geom) from teststrati;”””
cur.execute(sql)
result = cur.fetchone()
print result
(130, 30, u'{“type”:”Point”,”coordinates”:[272070.600040999997873,155389.387920000008307]}’)
With a non spatial table or view and the result as a dictionary:
conn = psycopg2.connect(“dbname=’testpostgis’host=’localhost’ user=’me'”)
dict_cur = conn.cursor(cursor_factory=psycopg2.extras.DictCursor)
dict_cur.execute(“””SELECT * from people;”””)
rec = dict_cur.fetchone()
rec.keys()
[‘name’, ‘id’]
rec.values()
(‘Jon Doe’,1)
# etc read the documentation of the module
QGIS(Pythonでログ出力)
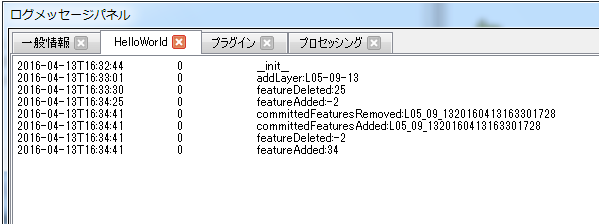
class HelloWorld:
    def __init__(self, iface):
        # Save reference to the QGIS interface
        self.iface = iface
        self.canvas = iface.mapCanvas()
        QgsMessageLog.logMessage("__init__", 'HelloWorld', QgsMessageLog.INFO)
QGISのログパネルに出力される
QGIS3ではこんなかんじ
[code]
from qgis.core import Qgis, QgsMessageLog
import configparser
import os
#======================================================================
# ログクラス
#======================================================================
class Trace:
def __init__(self):
print(‘init’)
@staticmethod
def info(tag, msg):
QgsMessageLog.logMessage(msg, tag, Qgis.Info)
[/code]
QGISのログ(QgsDebugMsg)を有効にする
QGISのソースを確認すると「QgsDebugMsg」で多くのログが吐かれている。
これはQGISの内部の動作を追うには大変参考になる。
※レンダリング関係はデバッカーで追うのは大変。
実際にqgslogger.cppを確認すると下記の環境変数を設定する必要がある。
QGIS_DEBUG:1
QGIS_LOG_FILE:ログファイルのフルパス
※QGIS_DEBUG_FILEは不明
int QgsLogger::sDebugLevel = -999; // undefined value
int QgsLogger::sPrefixLength = -1;
QString QgsLogger::sFileFilter;
QString QgsLogger::sLogFile;
QTime QgsLogger::sTime;

void QgsLogger::init()
{
  if ( sDebugLevel != -999 )
    return;

  sTime.start();

  sLogFile = getenv( "QGIS_LOG_FILE" ) ? getenv( "QGIS_LOG_FILE" ) : "";
  sFileFilter = getenv( "QGIS_DEBUG_FILE" ) ? getenv( "QGIS_DEBUG_FILE" ) : "";
  sDebugLevel = getenv( "QGIS_DEBUG" ) ? atoi( getenv( "QGIS_DEBUG" ) ) :
#ifdef QGISDEBUG
                1
#else
                0
#endif
                ;

  sPrefixLength = sizeof( CMAKE_SOURCE_DIR );
  if ( CMAKE_SOURCE_DIR[sPrefixLength-1] == '/' )
    sPrefixLength++;
}

void QgsLogger::logMessageToFile( const QString& theMessage )
{
  if ( sLogFile.isEmpty() )
    return;

  //Maybe more efficient to keep the file open for the life of qgis...
  QFile file( sLogFile );
  if ( !file.open( QIODevice::Append ) )
    return;
  file.write( theMessage.toLocal8Bit().constData() );
  file.write( "\n" );
  file.close();
}
qgis起動バッチ(qgis.bat)に以下を記述してQGISを起動すると指定されたログが出力される
set QGIS_LOG_FILE=C:\QGIS\log.txt
set QGIS_DEBUG=1
QGISのラベル
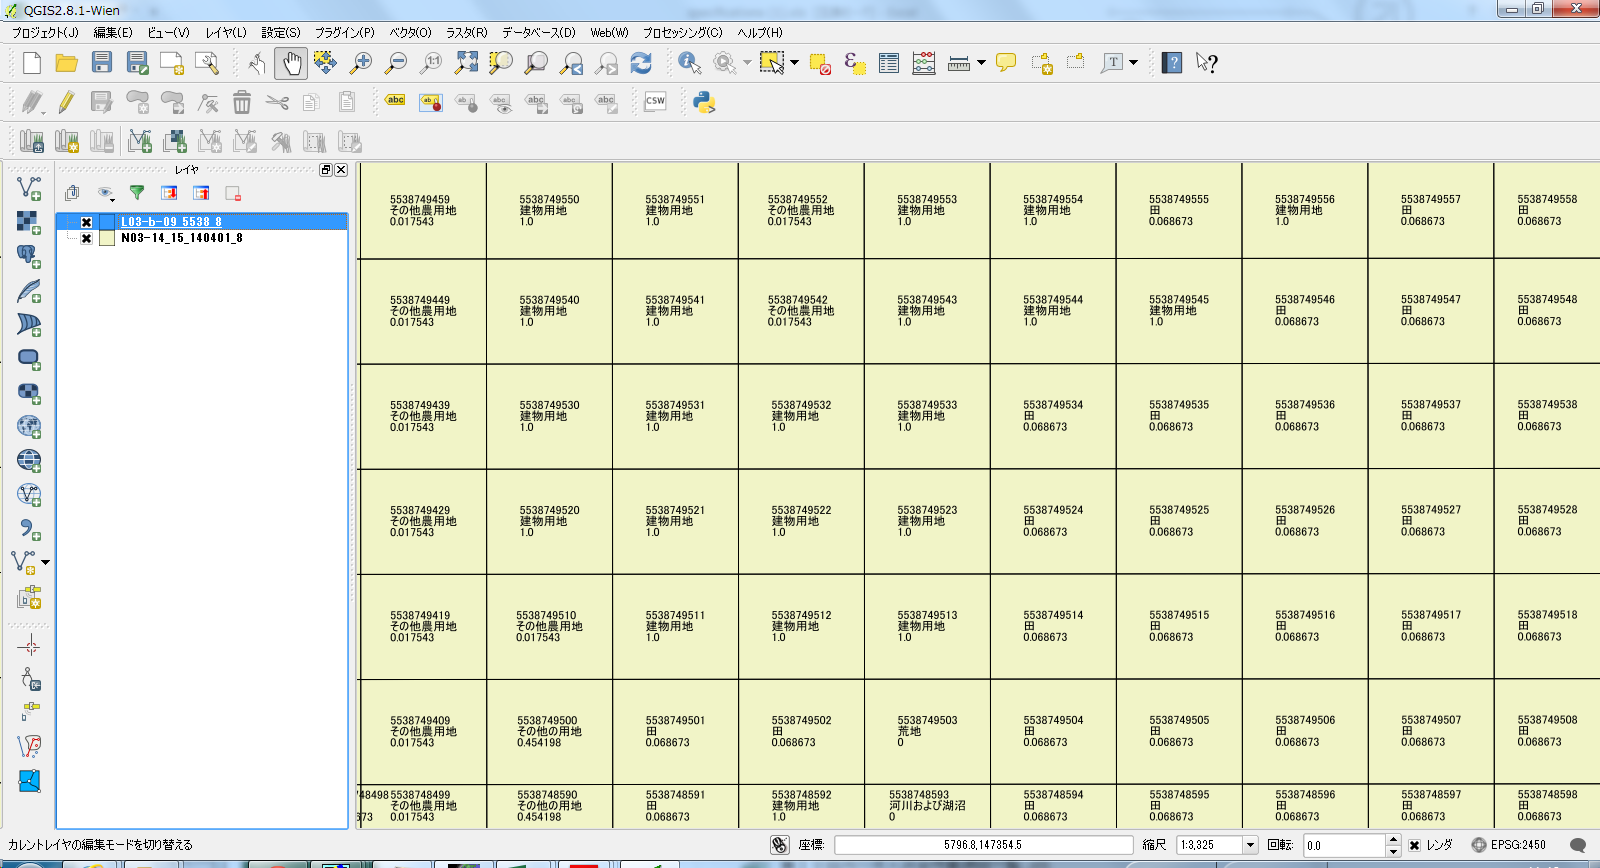
土地利用細分メッシュをQGISで表示し、各メッシュのラベルにメッシュ番号、土地利用種別、等を改行表示した時のラベルの設定の覚書
[code]
"メッシュ"
||
‘\n’
||
case
when "土地利用種" is ‘0100’ then ‘田’ || ‘\n’ || ‘0.068673’
when "土地利用種" is ‘0200’ then ‘その他農用地’ || ‘\n’ || ‘0.017543’
when "土地利用種" is ‘0500’ then ‘森林’ || ‘\n’ || ‘0’
when "土地利用種" is ‘0600’ then ‘荒地’ || ‘\n’ || ‘0’
when "土地利用種" is ‘0700’ then ‘建物用地’ || ‘\n’ || ‘1.0’
when "土地利用種" is ‘0901’ then ‘道路’ || ‘\n’ || ‘0.017343’
when "土地利用種" is ‘0902’ then ‘鉄道’ || ‘\n’ || ‘0.091575’
when "土地利用種" is ‘1000’ then ‘その他の用地’ || ‘\n’ || ‘0.454198’
when "土地利用種" is ‘1100’ then ‘河川および湖沼’ || ‘\n’ || ‘0’
when "土地利用種" is ‘1400’ then ‘海浜’ || ‘\n’ || ‘0’
when "土地利用種" is ‘1500’ then ‘海水域’ || ‘\n’ || ‘0’
when "土地利用種" is ‘1600’ then ‘ゴルフ場’ || ‘\n’ || ‘0.01762’
when "土地利用種" is ‘0000’ then ‘解析範囲外’ || ‘\n’ || ‘0’
end
[/code]
Windows版QGISをビルド(カスタマイズ編)
前回Windows上でQGISをコンパイルした。
今回はQGISのカスタマイズを前提にコンパイル環境を変更する。
QGISのカスタマイズの王道
通常QGISをカスタマイズする場合はプラグインを作るのがよい。
もちろんqgis_code.dllをベースに外側をフルスクラッチで作成することも可能。
カスタマイズの方針
QGISの内部を知るためにqgis.exeを直接カスタマイズする。
そのためにはVS2010でQTデザイナも使いたい。
QTの環境構築
QTのサイトからインストーラをダウンロードしてセットアップ(QTのバージョンはOSGE4Wと同じ4.8.6とする)
http://download.qt.io/archive/qt/4.8/4.8.6/qt-opensource-windows-x86-vs2010-4.8.6.exe
http://download.qt.io/official_releases/qtcreator/3.3/3.3.2/qt-creator-opensource-windows-x86-3.3.2.exe
http://download.qt.io/official_releases/vsaddin/qt-vs-addin-1.1.11-opensource.exe
qgisプロジェクトの変更
qgis.vcxprojをエディタで編集
変更前
[code]
<PropertyGroup Label="Globals">
省略
<Keyword>Win32Proj</Keyword>
省略
</PropertyGroup>
[/code]
変更後
[code]
<PropertyGroup Label="Globals">
省略
<Keyword>Qt4VSv1.0</Keyword>
省略
</PropertyGroup>
[/code]
VS2010を起動してqgis.vcxprojを開く。
ソリューションエクスプローラでqgisプロジェクトを選択し、QTメニューの「Convert project to Qt Add-in prokect」を実行。
qgis.vcxprojを再度エディタで編集して「C:/OSGeo4W/include/qt4」を「C:/Qt/4.8.6/include」に変更。
同様にQT関連のライブラリ(lib)もOSGeo4W配下のファイルではなく、C:/Qt/4.8.6配下のそれを参照するように変更。
以上でqgis.exeの実装に「qt-vs-addin」の恩恵を受けることができる。
もちろんデバックはVS2010からqgis.exeにアタッチする形で行える。
注意点としては
Windows版QGISをビルド
Windows7(32bit)でQGIS(2.8.1)をコンパイル
コンパイラは「VisualStudio 2010」
参考にしたサイトは定番の以下のサイト
QGISをソースからコンパイルする方法(Windows8.1 32bit環境)
Building QGIS from source – step by step
こちらも参考にしました
CMAKEをセットアップ
CNAKE2.8のダウンロードサイトからcmake-2.8.6-win32-x86.zipをダウンロードしてC:\CMakeにインストール
Flex、Bisonをインストール
Cygwinをインストールして、Flex、Bisonのパッケージをインストール
Flexのバージョンは2.5.39
Bisonのバージョンは3.0.4
※Cygwinはダウンロードするサイトによってパッケージのバージョンが違うかも
Gitをインストール
Gitの1.9.2をダウンロードサイトからダウンロードしてC:\Gitにインストール
Subversionをインストール
Subversionの1.8.11をC:\Subversionにインストール
※使わないかも
OSGeo4Wをインストール
OSGeo4Wをインストールして以下のパッケージとQGISをインストール
※QGISをインストールするのはコンパイルエラーになったモジュールを補うため。(プラグインなどは必ずしも正しくコンパイルされるとは限らないので)
expat
fcgi
gdal
grass
gsl-devel
iconv
pyqt4
qt4-devel
qwt5-devel-qt4
sip
spatialite
libspatialindex-devel
python-qscintilla
qwtは念のためにqwt5だけではなくqwtもインストールする
インストールされたパッケージ
| avce00 | 2.0.0-1 |
| curl | 7.15.1-2 |
| expat | 2.0.1-1 |
| fcgi | 2.4.0-1 |
| fftw | 3.2-1 |
| freetype-mingw | 2.3.7-1 |
| freexl | 1.0.0e-1 |
| gdal | 1.11.2-1 |
| gdal-python | 1.11.2-1 |
| gdal110dll | 1.10.1-1 |
| gdal15dll | 1.5.4-1 |
| gdal18dll | 1.8.1-0 |
| gdal19dll | 1.9.2-1 |
| geos | 3.4.2-1 |
| gpsbabel | 1.4.4-1 |
| gpsbabelfe | 1.4.4-1 |
| grass6 | 6.4.4-1 |
| gs | 9.07-3 |
| gsl-devel | 1.12-1 |
| gsl-libs | 1.12-1 |
| hdf4 | 4.2.0r3-4 |
| hdf5 | 1.8.11-1 |
| iconv | 1.9.1-1 |
| laszip | 2.2.0-1 |
| libcairo | 1.10.2-1 |
| libgeotiff | 1.3.0-3 |
| libintl | 0.14.4-2 |
| libjpeg | 6b-5 |
| libjpeg12 | 6b-3 |
| libmysql | 5.0.18-1 |
| libpng | 1.2.34-1 |
| libpq | 8.3.10-3 |
| libspatialindex | 1.7.0-1 |
| libspatialindex-devel | 1.7.0-2 |
| libtiff | 4.0.2-2 |
| libxml2 | 2.9.1-1 |
| msvcrt | 1.0.1-12 |
| msys | 1.0.18-7 |
| msys-grass | 1-5 |
| netcdf | 3.6.1-1 |
| ogdi | 3.2.0b1-4 |
| openjpeg | 2.0.0-1 |
| openssl | 1.0.1g-1 |
| pdcurses | 3.3-1 |
| proj | 4.8.0-0 |
| proj-datumgrid | 1.5-1 |
| proj-hpgn | 1.0-1 |
| psycopg2 | 2.4-1 |
| pygments | 1.4-3 |
| pyopengl | 3.0.1-1 |
| pyqt4 | 4.11.3-1 |
| pyspatialite | 3.0.1-1 |
| python | 2.7.4-2 |
| python-core | 2.7.4-3 |
| python-dateutil | 2.2-1 |
| python-help | 2.7.4-1 |
| python-jinja2 | 2-2.7.2-1 |
| python-markupsafe | 0.23-1 |
| python-numpy | 2.7-1.7.0-1 |
| python-pil | pil-1.1.7-1 |
| python-qscintilla | 2.8.4-1 |
| python-tcltk | 2.7.4-1 |
| python-testsuite | 2.7.4-1 |
| python-tools | 2.7.4-1 |
| python-win32 | 2.16-1 |
| pytz | 2014.2-1 |
| qgis | 2.8.1-1 |
| qgis-common | 2.8.1-1 |
| qscintilla | 2.8.4-1 |
| qt4-devel | 4.8.6-1 |
| qt4-libs | 4.8.6-1 |
| qwt-devel-qt4 | 6.0.2-1 |
| qwt-libs-qt4 | 6.0.2-1 |
| qwt5-devel-qt4 | 4-5.2.1-1 |
| qwt5-libs-qt4 | 4-5.2.1-1 |
| setup | 1.0.7-10 |
| shell | 1.0.0-13 |
| sip | 4.16.5-1 |
| six | 1.6.1-1 |
| spatialite | 4.1.1-1 |
| spatialite3dll | 3.0.1-0 |
| sqlite3 | 3.7.17-1 |
| szip | 2.1-1 |
| tcltk | 8.5.6-1 |
| wxpython | 2.8.12.1-1 |
| xerces-c | 2.7.0-1 |
| xerces-c-vc9 | 3.1.1-2 |
| zlib | 1.2.3-1 |
tat2tagのセットアップ
PhytonがインストールされているC:\OSGEO4W\binにパスを通す
txt2tags.pyをダウンロードしてC:\OSGEO4W\binにコピー
txt2tags-2.3.exeをダウンロードしてC:\txt2tagsにインストール
作業ディレクトリの用意
ディレクトリC:\qgis\2.8.1_01を作成。
ディレクトリC:\qgis\2.8.1_01\build-x86を作成。
C:\qgis\2.8.1_01をカレントにして以下のコマンドでQGISのソース等をダウンロード
※QGISのGITHUBのアドレスhttps://github.com/qgis/QGIS
[code]
git clone git://github.com/qgis/qgis.git
[/code]
C:\qgis\2.8.1_01\qgisにソースがダウンロードされる。
C:\qgis\2.8.1_01\qgisをカレントにして以下のコマンドでカレントのバージョンをリリースバージョんと同様の2.8.1に設定
現段階でのGISHUBのリポジトリの最新は2.8.2
[code]
git checkout ddccf8ee73eab92188a9055c472c58c86e3dc3b1
[/code]
C:\qgis\2.8.1_01\init.batを以下の内容で作成
[code]
set VERSION=2.8.1
set PACKAGE=qgis2.8.1
set PACKAGENAME=qgis2.8.1
set ARCH=x86
if "%VERSION%"=="" goto usage
if "%PACKAGE%"=="" goto usage
if "%PACKAGENAME%"=="" goto usage
if "%ARCH%"=="" goto usage
echo "set BUILDDIR"
pause
set BUILDDIR=C:\qgis\2.8.1_01\build-x86
echo "set OSGEO4W_ROOT"
pause
set OSGEO4W_ROOT=C:\OSGeo4W
echo "exec o4w_env.bat"
pause
call "C:\OSGeo4W\bin\o4w_env.bat"
echo "set O4W_ROOT"
pause
set O4W_ROOT=%OSGEO4W_ROOT:\=/%
echo "set LIB_DIR"
pause
set LIB_DIR=%O4W_ROOT%
echo "set PF86"
pause
set PF86=%PROGRAMFILES%
echo "set GRASS_VERSION"
pause
set GRASS_VERSION=6.4.4
echo "exec vcvarsall.bat"
pause
call "%PF86%\Microsoft Visual Studio 10.0\VC\vcvarsall.bat" x86
echo "exec SetEnv.Cmd"
pause
call "c:\Program Files\Microsoft SDKs\Windows\v7.1\Bin\SetEnv.Cmd" /x86 /Release
color
@echo on
echo "set path"
pause
path %path%;%PF86%\Microsoft Visual Studio 10.0\VC\bin
echo "set CMAKE_OPT"
pause
set CMAKE_OPT=^
-G "Visual Studio 10" ^
-D SIP_BINARY_PATH=%O4W_ROOT%/bin/sip.exe ^
-D QWT_LIBRARY=%O4W_ROOT%/lib/qwt5.lib
echo %CMAKE_OPT%
echo "set PYTHONPATH"
pause
set PYTHONPATH=
path C:\CMake\bin;%PATH%;c:\cygwin\bin
REM PROMPT qgis%VERSION%$g
echo "set BUILDCONF"
pause
set BUILDCONF=RelWithDebInfo
echo "set SRCDIR"
pause
set SRCDIR=C:\qgis\2.8.1_01\qgis
echo %SRCDIR%
echo "cd BUILDDIR"
pause
if "%BUILDDIR:~1,1%"==":" %BUILDDIR:~0,2%
cd %BUILDDIR%
echo %BUILDDIR%
if errorlevel 1 goto error
echo %CD%
if errorlevel 1 goto error
echo "check log"
pause
if errorlevel 1 goto error
if not exist build.log goto build
echo "del build.tmp"
pause
REM
REM try renaming the logfile to see if it’s locked
REM
if exist build.tmp del build.tmp
if exist build.tmp (echo could not remove build.tmp & goto error)
echo "ren build.log"
pause
ren build.log build.tmp
if exist build.log goto locked
if not exist build.tmp goto locked
echo "ren build.tmp"
pause
ren build.tmp build.log
if exist build.tmp goto locked
if not exist build.log goto locked
goto build
:locked
echo Logfile locked
if exist build.tmp del build.tmp
goto error
:build
echo "build"
if errorlevel 1 goto error
echo BEGIN: %DATE% %TIME%
if errorlevel 1 goto error
set >buildenv.log
echo "check qgsversion.h"
if exist qgsversion.h del qgsversion.h
if errorlevel 1 goto error
echo "check CMakeCache.txt"
if exist CMakeCache.txt goto skipcmake
if errorlevel 1 goto error
echo CMAKE: %DATE% %TIME%
if errorlevel 1 goto error
echo "set LIB"
pause
set LIB=%LIB%;%OSGEO4W_ROOT%\lib
echo %LIB%
echo "set INCLUDE"
pause
set INCLUDE=%INCLUDE%;%OSGEO4W_ROOT%\include
echo %INCLUDE%
echo "set GRASS_PREFIX"
pause
set GRASS_PREFIX=%O4W_ROOT%/apps/grass/grass-%GRASS_VERSION%
echo %GRASS_PREFIX%
echo "cmake"
pause
cmake %CMAKE_OPT% ^
-D PEDANTIC=TRUE ^
-D WITH_QSPATIALITE=TRUE ^
-D WITH_SERVER=FALSE ^
-D SERVER_SKIP_ECW=TRUE ^
-D WITH_GLOBE=FALSE ^
-D WITH_TOUCH=FALSE ^
-D WITH_ORACLE=FALSE ^
-D WITH_GRASS=TRUE ^
-D WITH_CUSTOM_WIDGETS=TRUE ^
-D CMAKE_CXX_FLAGS_RELEASE="/MD /MP /O2 /Ob2 /D NDEBUG" ^
-D CMAKE_BUILD_TYPE=%BUILDCONF% ^
-D CMAKE_CONFIGURATION_TYPES=%BUILDCONF% ^
-D GEOS_LIBRARY=%O4W_ROOT%/lib/geos_c.lib ^
-D SQLITE3_LIBRARY=%O4W_ROOT%/lib/sqlite3_i.lib ^
-D SPATIALITE_LIBRARY=%O4W_ROOT%/lib/spatialite_i.lib ^
-D PYTHON_EXECUTABLE=%O4W_ROOT%/bin/python.exe ^
-D PYTHON_INCLUDE_PATH=%O4W_ROOT%/apps/Python27/include ^
-D PYTHON_LIBRARY=%O4W_ROOT%/apps/Python27/libs/python27.lib ^
-D QT_BINARY_DIR=%O4W_ROOT%/bin ^
-D QT_LIBRARY_DIR=%O4W_ROOT%/lib ^
-D QT_HEADERS_DIR=%O4W_ROOT%/include/qt4 ^
-D QWT_INCLUDE_DIR=%O4W_ROOT%/include/qwt ^
-D CMAKE_INSTALL_PREFIX=c:/qgis/%PACKAGENAME% ^
-D FCGI_INCLUDE_DIR=%O4W_ROOT%/include ^
-D FCGI_LIBRARY=%O4W_ROOT%/lib/libfcgi.lib ^
-D WITH_INTERNAL_JINJA2=FALSE ^
-D WITH_INTERNAL_MARKUPSAFE=FALSE ^
-D WITH_INTERNAL_PYGMENTS=FALSE ^
-D WITH_INTERNAL_DATEUTIL=FALSE ^
-D WITH_INTERNAL_PYTZ=FALSE ^
-D WITH_INTERNAL_SIX=FALSE ^
%SRCDIR%
if errorlevel 1 (echo cmake failed & goto error)
call "C:\Program Files\Microsoft Visual Studio 10.0\Common7\IDE\devenv.exe"
:skipcmake
if exist noclean (echo skip clean & goto skipclean)
echo CLEAN: %DATE% %TIME%
:skipclean
echo ALL_BUILD: %DATE% %TIME%
goto end
:usage
echo usage: %0 version package packagename arch
echo sample: %0 2.0.1 3 qgis x86
exit
:error
echo BUILD ERROR %ERRORLEVEL%: %DATE% %TIME%
for %%i in ("" "-common" "-server" "-devel" "-grass-plugin" "-globe-plugin" "-oracle-provider") do (
if exist %ARCH%\release\qgis\%PACKAGENAME%%%i\%PACKAGENAME%%%i-%VERSION%-%PACKAGE%.tar.bz2 del %ARCH%\release\qgis\%PACKAGENAME%%%i\%PACKAGENAME%%%i-%VERSION%-%PACKAGE%.tar.bz2
)
:end
echo FINISHED: %DATE% %TIME%
[/code]
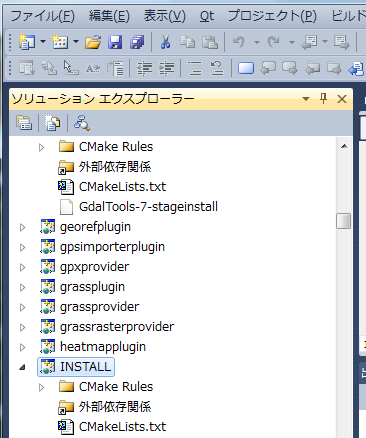
vc2010が起動したらqgis2.8.1.slnを開いてコンパイルする。
いくつかのプロジェクトはコンパイルエラーになった。
processing-59-stageinstallのように複数の*.uiが入っているプロジェクトは*.uiからui_*への変換でエラーになることがある。この場合はソリューションエクスプローラ上で*.uiを右クリックしてひとつひとつコンパイルした後に同プロジェクトをビルドすれば、ビルドが通る可能性がある。
いくつかのPython系のプラグイン関係のプロジェクトビルドを通らなかった。
pyplugin-installerプロジェクトで原因を調べてみると、同プロジェクトに設定されているカスタムビルドの以下のコマンドでエラーが発生していた。
[code]
C:\qgis\2.8.1.2\qgis\scripts\pyuic4-wrapper.bat C:/OSGeo4W/bin/pyuic4.bat C:/qgis/2.8.1.2/build-x86/output/bin/RelWithDebInfo C:/qgis/2.8.1.2/build-x86/output/python C:/qgis/2.8.1.2/qgis/python/pyplugin_installer/qgsplugininstallerfetchingbase.ui -o C:/qgis/2.8.1.2/build-x86/python/pyplugin_installer/ui_qgsplugininstallerfetchingbase.py
[/code]
pyuic4-wrapper.bat
[code]
set PYUIC4=%1
set PATH=%2;%PATH%
set PYTHONPATH=%3;%PYTHONPATH%
%PYUIC4% %4 %5 %6 %7 %8 %9
[/code]
pyuic4.bat
[code]
@"C:\OSGeo4W\bin\python.exe" "C:\OSGeo4W\apps\Python27\lib\site-packages\PyQt4\uic\pyuic.py" %1 %2 %3 %4 %5 %6 %7 %8 %9
[/code]
どうやらpython.exeでエラーが発生しているようなのpython.exeを単独で実行してみると「 ImportError: No module named site」が出力される。
よって以下の環境変数を設定ひて再度、実行すると
[code]
SET PYTHONHOME=C:\OSgeo4w\apps\Python27
[/code]
ビルドエラーとなるプロジェクトは以下の2つに減った。
synccrsdb
qgis_regression1141
インストール
インストール先のディテクトリ「C:\qgis\qgis2.8.1」を作成
※インストール先はCMAKEにパラメータ「CMAKE_INSTALL_PREFIX」で指定したディレクトリ
プロジェクト「INSTALL」を実行してインストール
起動バッチの作成
OSGEO4WにあるQGIS起動バッチを参考に以下のバッチを作成して実行
[code]
@echo off
call C:\OSGeo4W\bin\o4w_env.bat
call C:\OSGeo4W\apps\grass\grass-6.4.4\etc\env.bat
@echo off
path C:\OSGeo4W\bin;C:\qgis\qgis2.8.1\bin;C:\OSGeo4W\apps\grass\grass-6.4.4\lib;%PATH%
set QGIS_PREFIX_PATH=C:\qgis\qgis2.8.1
set GDAL_FILENAME_IS_UTF8=YES
rem Set VSI cache to be used as buffer, see #6448
set VSI_CACHE=TRUE
set VSI_CACHE_SIZE=1000000
set QT_PLUGIN_PATH=C:\qgis\qgis2.8.1\qtplugins;C:\OSGeo4W\apps\qt4\plugins
start "QGIS" /B "C:\qgis\qgis2.8.1\bin\qgis.exe %*
[/code]
以上
業務連絡
\\gyan2014\share\project\qgisに今回のリソースがあります。
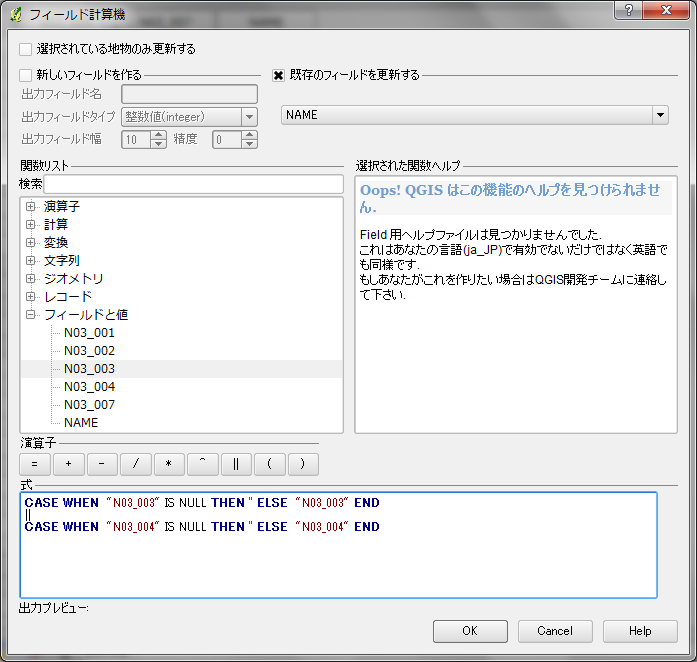
QGIS フィールド計算機で文字列結合
QGISでString型のフィールド同士を結合して別のフィールドを更新するにはフィールド計算機で
以下の計算を実行
例)「N03_003」と「N03_004」を結合して「NAME」を更新
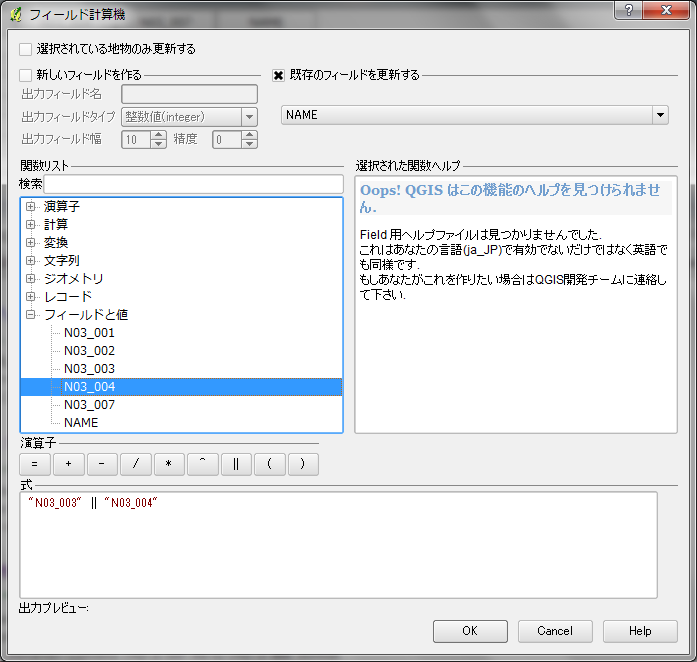
しかし「N03_003」、「N03_004」のいづれかの値がNULLの時は結合結果もNULLになってしまう
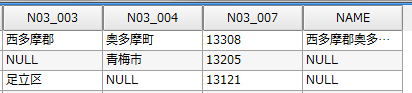
「CASE WHEN 式 THEN 値1 ELSE 値2 END」を使用してNULLを空文字に変換して対応